
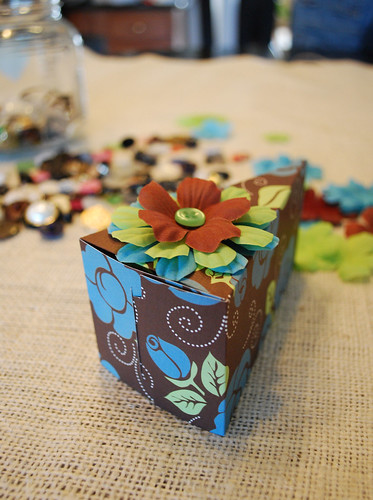
I've been so busy getting ready for teacher appreciation week, that I completely missed secretary's day (last week). The ladies in the office at our school are really awesome, so I made these slices of paper cake for them.
I just learned how to do this craft, and it is sooooo easy! You can use them for all kinds of things, too:
~Fill them with candy or small gifts
~Give them to teachers for teacher appreciation week (especially if your kids have 50 teachers)
~Give one to a girlfriend on her birthday
~Make a whole cake, filled with candy, and display on a cake stand for a birthday party.
Wanna learn how?
 Get some cute scrap paper, and cut it to fit your printer. My Target Dollar Spot has a pack of scrap paper for $1.00. You won't go broke on this little gift.
Download this image. *Updated- I didn't realize my computer had flipped the image and resized it for me, and it wasn't printing right for some people. So I resized the image and rotated it for you. It should almost cover an entire 8 1/2 x 11 sheet of paper when it prints. The actual image size should be 9.91" height x 8.05 " width. Sorry if that drove anyone nuts.*
**I've updated this post again ... the image file changes sizes for some people so I've saved the file as a PDF and you can download the file here. This way, the file should print in the correct size. **
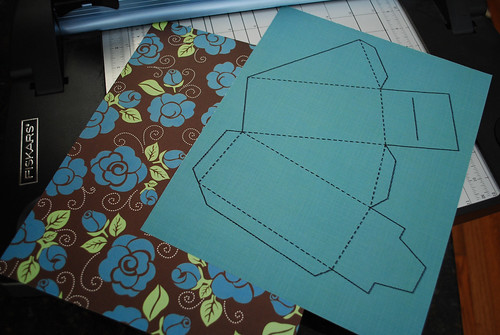 Print it, but make sure to print it on the side of the paper that is going to be inside the cake. And test print on white before you stick the nice paper in the machine.
 Cut it out.
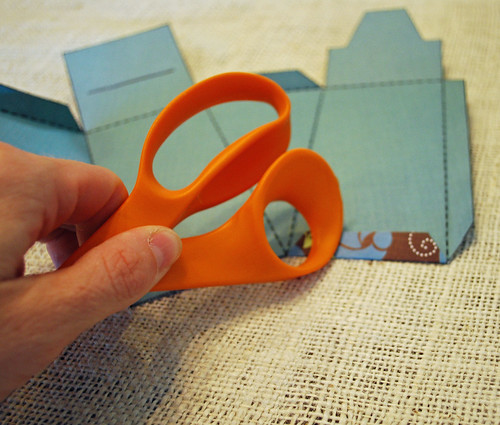 Fold along all the dotted lines, and then score the folds with a smooth surface. I use the handle of my scissors.
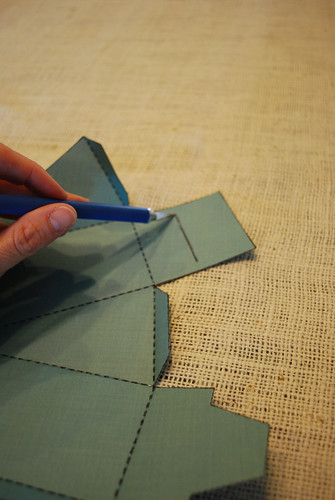 Cut along this one solid line with a craft knife or razor blade.
 Glue the tab at the short end of the cake, and
  along the side. I like using glue sticks because you have a little time to adjust the paper before it dries. Do not glue the tabs at the fat end of the cake!
 Attach the glued tabs like this.
Fill with candy (or whatever), and tuck the tab into the slot. If you like, you can glue on a flower, a ribbon or whatever embellishments you like.
If you would like to see some paper cake inspiration, you can go here, here, here and a bunch of cakes on this blog. If you're not crafty and you just want to buy one, go to this Etsy shop, or this Etsy shop. Their cakes are beautiful.
If you make one, stop by and tell me about it!

46 comments:
That is so cool! I love faux cakes :) I really want to try this!
All the best,
Allison
THANKS for sharing the pattern! How cute! Love the idea! :)
Very cool - Love the tutorial. Thanks for the shout out.
Those paper cake boxes are adorable. They do NOT look easy though!! You are incredible to do that for 50+ people!!!
How cute is that! Thanks for sharing!
I will repeat what everyone else says, SO COOL! and pretty! Need to file that one away for future use - great for party favors.
cute box. love the colors
Thanks for the template and the directions. We are moving, so all of my paper is packed, but I will have plenty of crafting time once we are settled.
Ok, this is just toooo coooool! I gotta' get some nice paper and we are gonna' make a BUNCH of these for a bunch of friends! Thanks for the great idea!!!
I love paper crafts and this is one of the "sweetest" ones I have seen in a long time. Thanks a million for sharing.
I am in charge of teacher appreciation week for the entire elementary school and this idea saved me!!! I am a crafty person, but I thought that your pictures along with the directions were exremely "user friendly". GREAT job!! Now I know what I will be doing this weekend!
I love it! Thanks for the pattern!
These would be so much fun at a birthday party! Thanks for the pattern...I'll be linking to your post on www.onecraftyplace.com Thanks! (p.s. I found you via Katie's Nesting Spot)
Congratulations on your talent, everything here is so beautiful. I was delighted.
Love
Márcia
From: Brazil
This is awesome! I've been trying to come up with something to go with the gifts I'm handing out to teacher/staff at the end of the year, and this is gorgeous!!
Macey
this is sooooo cute, but when i print it out its too small please help
thanks
cortezalejandro@sbcglobal.net
I made this box of cake .... and put on my blog with your templante. In my blog are here and thanks for sharing will also my thanks. Follow the credits for you a great artist.
http://neusinhafusco.blogspot.com
Super cute.. Might make me try paper crafting.. I linked to your blog on my site here..http://beebashive.blogspot.com/2009/06/zero-calorie-cake.html
Thanks!
Alex
I love this cake! Do you have a picture of the entire cake?
This is really great! I'll be featuring this:-)
thank you for not only sharing the idea but also for giving up the pattern this is so great!!
Hi! Thanks for the tutorial! I loved the cake and made one for myself, it's in my blog if you'd like to see! :o)
Best wishes!
I made my own christmas-y version and am posting it!!
****BRILLIANT!!!***
Oh My Land- this is just spectacular!
YOu just earned youreself a Follower, Young Lady!
Wow I really love this idea! Thanks for sharing it, I love doing crafts too. Check out my blog http://recklessbliss.blogspot.com/ I did an earring holder craft that was a lot of fun!
Thought this was great to have a tutorial for those that don't have a Cricut! Featured on my blog today!
Kim
http://frostmeblog.blogspot.com/2010/02/nice-package-o.html
looks quite a great post, it's having good information for research analysis. great job
Lovely tutorial!
Thank you so much for this template and great tutorial! I've been wanting to make this cake slice for awhile and now I know how! Love the paper and decorations you used on this!
Great tute. Thank you! I just made one for my son's teacher.
I found your paper cake idea on Skip to My Lou and then used it for my own teacher appreciation gift this week. I love, love, love the idea and appreciate your generosity in sharing it and the pattern! I also blogged about it and included a link to your site as well. http://shewearsflowers.blogspot.com/2010/05/2-4-6-8-who-do-we-appreciate.html Mine is not nearly as beautiful as yours, but...;)
Thank you!
tammy
Cool gift ideas! Glad I saw this post. I've got an idea. Looking forward for your next post. Keep posting.
-yumi-
thank you for the tutorial I have finally got around to do it. Its on my blog now...
http://artycrafty.wordpress.com/2010/08/31/to-do-list-tues-24-25-26-scrapping/
Great idea and great tutorial
Thanks for sharing.
Aanee xxx
Florist Letterkenny
Thanks for this fantastic tutorial!
You`r work is beautiful!!
Started chocolate site http://shoko.by SHOKO BY
Thank you so much for the tutorial for sure that was absolutely a great paper cake.
toni
Oh my... I just love this. This can also be used for items other than cakes right? so cute. Thanks a lot for sharing your lovely creation :)
I make these a lot! They are so cute and so fun!Thank,s for great sharing.
Send gifts to pakistan from usa
It's so cute!I've been looking around for an original idea for my son's birthday party when I've found your tutorial!That's it!I'm going to make this cake!I've already printed it!Thanks for sharing!!
Greetings from Greece
Wow, what a beautiful paper box, I like the very detailed step by step tutorial, now I can definitely do this myself, thanks for sharing this here. :)
Paper crafts is one of my favorite project to make, I just love this paper cake tutorial, I never made one like this before, so glad to have found this here. Thanks.
Thank you so much for sharing the template!!!!
Here is my try http://www.flickr.com/photos/63465362@N04/5772239601/in/photostream/
Thanks a lot for sharing the pattern! :)
Violeta
From Mexico
Thanks for posting this! It is such a great idea. I'm going to make these for party favors for my daughter's birthday!
It is the most innovative idea i have ever came across and i think it is an item which can be presented at every good occasion. Really liked your idea and looking forward for more beautiful and innovative ideas.
gifts for Ramadan 2012
This is awesome! Do you mind if I put a link to your tutorial on my blog?
Amanda
softandstiffpeaks.blogspot.com
Post a Comment